Step-by-step Guide to add Article Schema to your Blog posts
Adding SEO to your blog posts will increase its ranking in Google. So
increasing the SEO by adding
article schema markup
will boost the traffic to your site. And also it helps Google to show
your webpage as rich snippet. Google recommends adding schema markup in JSON-LD.
Removing Default Blogger Schema
Why we have to remove default blogger schema? If you have the default
blogger schema then it shows your organisation as blogger and publisher and
everything as blogger.
It does not have much SEO. So we have to remove the default blogger
schema.
1. First copy any post URL and paste in rich snippet tool and check if your post contain any default blogger schema or
not.
2. If yes means then go to your blogger theme section, backup your theme and click edit
HTML.
3. Now press CTRL + F and search for
json and press enter until
you can find a tag id containing
'postMetadataJSON' or
something like this. And below that you can also find many tag ids
like 'postMetadataJSONImage'
, 'postMetadataJSONPublisher' .
4. If you delete this means, it will reappear again and
again.
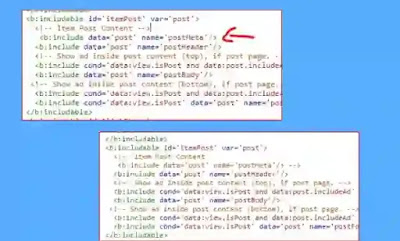
5. So search for
'postMeta' . You can
see that it will locate inside the tag id
'itemPost' and
var='post' . So what you
need to do is comment the line <b:include data='post' name='postMeta'/>
which is located inside the tag id
'itemPost' . (Use <!-- --> to comment a line)
6. Finally Save the theme. And check your post URL in rich snippet,
it shows default blogger schema or not.
Removing default blogger schema is same method for most of the
themes. May be little different according to your theme. So
you have to understand the code and take care about it.
Adding Full SEO customised Structured Data for Blogposts
1. Go to your blogger theme section, backup your theme and click
edit HTML.
2. Click CTRL + F and find
<data:post.body/> and
paste the below code just below
<data:post.body/>
tag.
<b:if cond='data:view.isPost'>
<script type='application/ld+json'>
 {
 "@context": "https://schema.org",
 "@type": "Article",
 "@id": "<data:post.url/>#post-body-<data:post.id/>",
 "mainEntityOfPage": "<data:post.url/>",
 "headline": "<data:post.title/>",
 "name": "<data:post.title/>",
 "url": "<data:post.url/>",
 "description": "<data:blog.metaDescription/>",
 "image": "<data:post.featuredImage/>",
 "datePublished": "<data:post.date.iso8601/>",
 "dateModified": "<data:post.date.iso8601/>",
 "author": {
 "@type": "Person",
 "name": "<data:post.author.name/>",
        "image":"Author-Image",
 "sameAs":"Author-social-media"
 },
 "publisher": {
 "@type": "Organization",
 "name": "Your-website-name or Brand-name",
        "url": "Your-website-URL",
 "description": "Your-website-description",
 "logo": {
 "@type": "ImageObject",
 "url": "your-website-logo"
 },
      "sameAs": [
        "your-website-social-media"
                      ]
 }
}
</script>
</b:if>
3. Now do some customisation and check the code is correct
in rich snippet testing tool. After that save the theme.
4. Now check your Blog post URL with the
rich snippet tool.
5. If it shows your article schema, then you have done.
Customisations:
The red colored words you need to customise.
- "@type": "Article", - You can choose Article or Blogposting based upon your content you write. Most websites in the internet will choose Article than Blogposting. Because article schema will reach and succeed more in the internet than Blogposting schema according to Similartech.com
- image":"Author-Image", - Paste the URL of the author image in this area.
- "sameAs":"Author-social-media" - Add the author social media.
For example - if author have only one social media account, then
use
"sameAs":"https://twitter.com/username" . If author have
many social media, then you need to use
"sameAs":[
"https:twitter.com/username",
"https://facebook.com/userid"
]
- "name": "Your-website-name or Brand-name", - Use your website or brand name
- "url": "Your-website-URL", - Place your website URL here.
- "description": "Your-website-description", - Give a rich description for your website
- "url": "your-website-logo" - URL of your website logo.
- "sameAs": [
"your-website-social-media"
]
- Add the website your media or any wikipedia pages of your
website. For example - If your website has only one social media then use
"sameAs":"website-social-media"
Free tools to generate Schema Markup
You can also generate the schema markup with the help of free
tools.
Testing Schema Markup tools
Use the Google Rich Results tool to check your schema is error
free.
-----------------------------------------------------------------------------------------------------------------------------
Last Updated on 19th June 2021, 10:30 PM IST


This comment has been removed by the author.
ReplyDeleteMost of the themes follow the same. But in sometimes it may vary. You can check your url in rich results and select the detected schema and select detected items and click the type, see the code on the right side window. And locate the code location by seeing the codes before and after this code. Try to locate it in your theme and find the location of your default blogger schema.
DeletePost a Comment